Monday, 30 July 2012

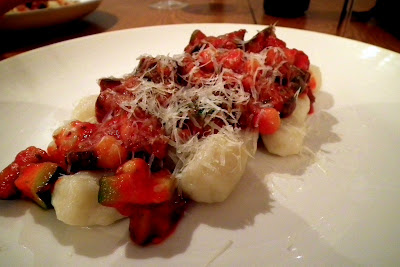
Meatless Monday - Potato Garlic Gnocchi

Gnocchi - first of all, it is not pronounced "gah-nok-chi", or any variation of that.  The only somewhat accurate, but easier way of saying it is "naw-kee", but if you really want to get it right try "nyawk-kee"

Well, now that we've got that sorted out...what IS gnocchi?  It's more than one of those things you see on the menu at Italian restaurants and think "ummmm...I have no idea what that is...so, I'll just have the chicken fingers".

It's basically little potato and flour dumplings, though they can be made with many different kinds of veggies instead of potatoes.  I've made them with squash, and also with spinach - perhaps I will make one of these variations to use as a future recipe.  But, for today, we're going with a basic potato gnocchi, with a bit of garlic thrown in there for interest.  See, not scary at all.  Really quite simple, actually...as you will see below!


Here it is, folks:

GNOCCHI:
Ingredients:
3 or 4 regular sized potatoes - I like yellow, but any kind will do.
1 or 2 cloves of garlic
1/2 tsp salt
1 egg
2 cups of all purpose flour (I normally would do 1 cup each of whole wheat all purpose, but I was out of ww, so this is what I did)

Directions:
1) Peel the potatoes and cut them into chunks.  Steam the potatoes until soft (approx 25 min)
2) Mash the potatoes until smooth.
3) Mix in the garlic, salt and egg.
4) Mix in the flour a little at a time until you have soft dough (imagine pizza dough). Use more or less flour as needed.
5) Bring a large pot of lightly salted water to a boil. While you wait for the water, make the gnocchi. On a floured surface, roll the dough out in several long snakes, and cut into 1-inch sections. Gently roll each section with a fork (the grooves help the sauce stick better).  Drop the pieces into the boiling water, and allow them to cook until they float to the surface.  This will only take about 2 minutes!   Only do as much of the batch as will fit nicely in the pot, leaving room for the pieces to float up.  Remove the floating pieces with a slotted spoon, and keep warm in a serving dish.  Then repeat the process for the next batch.  Serve with sauce (below).

SAUCE:
Ingredients:
2 tbsp oil
1/2 onion
1 zucchini, chopped
4 or 5 mushrooms, sliced
1 C chick peas
1 jar of tomato sauce
a splash of soya sauce
a squeeze of BBQ sauce
chopped fresh herbs (I like basil and oregano...dry will work great too!)...to taste

Directions:
1) Heat the oil in a frying pan (medium heat).
2) Saute the onion until it starts to get soft.  Add the zucchini and mushrooms.  Cook until they start to soften up.
3) Add the chick peas; tomato, soya and BBQ sauces; and the herbs.  Turn the heat to medium-low, and cook until the sauce is warmed through.  *Optional - if you let it simmer for 10 min or so, on low, the flavours will blend more, but the zucchini will be very soft.
4) Serve over gnocchi (or whatever kind of pasta, really).  Top with grated Parmesan (optional).

ENJOY!  If you try this, leave a comment below to let me know how it goes!
Monday, 23 July 2012

Meatless Monday - Tortellini Salsa Rosa and Detox Salad

It's Meatless Monday!  Today's recipe is Tortellini Salsa Rosa.

This recipe was inspired by a menu item at "The Cajun Pepper" restaurant in Chatham, ON.  It's a twist on a standard Rosé sauce, using salsa instead of tomato sauce - a great addition to a mexican themed family night!

So, here's the recipe:

TORTELLINI SALSA ROSA
Ingredients:
Tortellini (or cappelletti...same thing)

Alfredo Sauce (I used a dry mix - need to add milk and margarine.  Or you could buy a can of sauce, or make your own)

Salsa (I made my own using tomato, pepper, onion, lime juice, and epicure mix...but you could just buy a can)

Directions:
1) Make tortellini according to package.
2) While tortellini is cooking, make alfredo sauce according to package.
3) When sauce is cooked, add salsa and stir it in.
4) Pour the Salsa Rosa sauce over the tortellini!  Yup, it's that easy!!!

DETOX SALAD
Now, I won't claim to have come up with this on my own.  I was inspired by this recipe: Oh She Glows Detox Salad
Ingredients:
Broccoli (1/2 bunch)
Cauliflower (1/2 head)
Carrot (1 large)
Yellow Pepper (1/2)
Parsley (a small handful)
Raisins (handful)
Sunflower Seeds (handful)
Honey (drizzle)
Lemon Juice (1 to 2 tbsp)

Directions:
Chop up all of the veggies and parsley (I used my handy tupperware chopper)
Throw in the sunflower seeds and raisins.
Pour in honey and lemon juice.
Stir and serve.  Best if cold.

Thursday, 19 July 2012

Trop Pops!

This summer I made the best impulse buy of my life (okay...maybe I'm exaggerating, but it WAS really a good buy)...a popsicle tray for $1.99 at Zehrs!  I thought, maybe I'd occasionally make a treat for the nieces and nephews when they would come over or something...but once I started, I realized that I could make
HEALTHY frozen treats
that
actually satisfied my craving for ice cream!!!

I love the fun summer themed handles on my popsicle tray.

The secret???

Frozen Bananas.
They are so creamy, and can be blended with just about anything.  So, whenever I have a banana or two that have ripened more than I prefer, I pop them in the freezer to be pureed into the next popsicle batch.

To make delicious, healthy popsicles, just blend together anything that you would put into a smoothie, pour into molds, and freeze (takes about 4 hours).  Don't have molds???  No problem!  Just pour them into small glasses and stick popsicle sticks in from the dollar store.  To hold the sticks in place before freezing, just put plastic wrap over the glass, then poke the sticks through.

But, if you need some inspiration, here's the "recipe" for the popsicles I just made: "Trop Pops".  (Note: measurements are very rough...I just throw whatever looks like the right amount into a bowl, then blend).


Trop Pops
2 frozen bananas (peeled)
1 ataulfo mango (peeled, and cut off the pit)
1 large dollop of coconut yogurt
2 large dollops of plain 2% yogurt
1/2 can pineapple tidbits with some of the juice

Directions: Put everything into a bowl and use a stick blender to puree it.  If you like texture in your popsicles, leave chunks.  (You could also use a regular blender or food processor).  Then pour into molds and freeze.  Wait 4 hours, then eat them.

*makes about 7 popsicles, with some leftover for a delicious smoothie!

Monday, 16 July 2012

Meatless Monday - Vegetarian Shepherd's Pie

This is a delicious, hearty meal.  It's a good one to try if you do not eat a lot of vegetarian meals, or if you are not familiar with lentils.  It's also a nice meal to make if you are having non-vegetarian company for dinner because it is still a "meat-and-potatoes" kind of dish.  You can make it in a large casserole dish, but sometimes we like to make individual mini-dishes for something "fancy".

...this is just a picture of shepherd's pie, not MY recipe (I forgot to take a picture).  I will replace the picture when I make this again.
Ingredients:

  • 8-10 large or medium potatoes (I prefer red or yellow)
  • 2 tbsp margarine
  • 1/2 C milk (I use soy milk, but any kind will do)
  • Salt to taste
  • 2 tbsp olive oil
  • 1 large onion, chopped
  • 2 cloves garlic, minced
  • about 10 cremini or white mushrooms
  • 2 15-oz cans of lentils, drained (not rinsed), or 3 1/2 C cooked green lentils with a bit of liquid reserved*
  • 1 or 2 tbsp soy sauce
  • 2 tbsp seasoning blend (e.g. a ClubHouse mix, Epicure, Mrs. Dash, etc)
  • black pepper to taste
  • 3 tbsp cornstarch
  • 1 1/2 C frozen peas or corn, thawed

Directions:
  • Peel and dice the potatoes. Place in a large saucepan with enough water to cover. Bring to a simmer, then cover and simmer until tender, about 20 minutes. Drain and transfer to a small mixing bowl
  • Stir the margarine into the potatoes until melted, then add the milk and mash until fluffy. Cover and set aside until needed. Preheat the oven to 400 degrees.
  • While the potatoes are cooking, heat the oil in a medium skillet. Add the onion and sauté over medium heat until translucent. Add the garlic and mushrooms and continue to sauté until the onion is golden.
  • Add the lentils and their liquid and bring to a gentle simmer. Stir in the optional soy sauce, seasoning blend and pepper. Cook gently for 5 minutes. Combine the cornstarch with just enough water to dissolve in a small container. Stir into the lentil mixture.
  • Mix the frozen peas or corn into the lentil mixture.
  • Lightly oil a casserole dish.  Pour in the lentil mixture, then spread the potatoes evenly on top.
  • Bake for 35-40 minutes (or until the potatoes start to turn slightly golden and crusty).
  • Take out of the oven and let cool for 5-10 minutes.
  • Cut into squares or wedges and serve!  Enjoy!

*Cooking lentils is EASY.  You can cook them in your rice cooker or a pot, just like rice.  No need to pre-soak or anything.

Thursday, 12 July 2012

Chopped Salad with Avocado Dressing

I realized today that the avocado that I bought the other day was almost too ripe.  I needed to use it right away, so I whipped up this salad to accompany the pizza we were having for lunch today.


Salad:
About 6 or 7 grape tomatoes.
1/2 an english cucumber
1/2 an orange pepper
1/3 C broccoli
about 1/3 C peas (frozen, thawed)
a handful of sunflower seeds
about 5 leaves of fresh basil, chopped

Dressing:
1/2 avocado
1 clove garlic (grated)
2 tbsp lemon juice
3 tbsp water
chopped fresh basil (about 2 leaves)
Salt (to taste)

Instructions:
1 - Put all of the dressing ingredients into a food processor or blender (or use a stick blender like me), and puree them.  Set aside.
2 - Chop the veggies (except the peas)
3 - Mix in peas, sunflower seeds and basil
4 - Pour the dressing over the salad.
5 - EAT!

Tuesday, 10 July 2012

Homemade Almond Butter - EASY!

Who knew that making homemade nut butters could be SO EASY?!?!

All you need is a food processor and whatever kind of nut or seed you want (I do not, however, recommend using a person who IS nuts...*).

That's IT.  Oh, and something to keep it in.  And an appetite.

So, here's what you do.

Measure out the nuts you want to use.  I used 1 Cup - it made 1/2 of a small mason jar of butter.  I made almond butter with raw, unsalted almonds.  You could use salted, roasted, seasoned, etc.  You could mix a bunch of nuts together.  Whatever.


Then, put the nuts into the food processor and turn it on.

As the oil is released from the nuts, it may start to stick to the sides.  I had to stop the food processor every minute or so to scrape the sides.

Ooooohhhh, look at that food processor go!

Eventually, the nuts will start sticking together and form a ball, like this:

Then, ALL OF A SUDDEN, the ball will release itself into a creamy, delicious BUTTER.

When it is to the consistency you like, put it into a jar!

Then eat the delicious goodness :)  Enjoy!

If you keep it in the cupboard, it will separate, but you can still use it - you just have to stir it together.  If you don't want it to separate, then keep it in the fridge. MMMmmmMMMmmmMMMmmm.

Note:  I am not brilliant.  I got this idea from pinterest, from this site: http://www.loveveggiesandyoga.com/2012/07/homemade-peanut-butter.html

*Matt did not marry me for my sense of humor!

Monday, 9 July 2012

Meatless Monday - Stuffed Peppers

I've decided to try this new "feature" on my blog - "Meatless Monday"!  My husband and I are what you might call vegetarians MOST of the time.  We occasionally eat fish and seafood, and will VERY occasionally eat other types of meat depending on the circumstance, but for the most part we eat meatless.  I frequently get asked for ideas for meatless meals when people are having company that is vegetarian, or if they want to try something new and healthy.  Granted, not ALL vegetarian meals are healthy, but in this feature, I will try to have mostly healthy meals.


Cranberry-Pecan Stuffed Peppers
This is one of my all time favourite meals, and I often serve it when we have company.  For those of you who "don't like tofu", this is a good recipe to show you that tofu does not have to be flavourless and mushy!  Since cranberries and pecans can be expensive, I sometimes substitute raisins and walnuts, and it's still delicious.

Ingredients:
1 1/2 cups brown rice
  • 6 large bell peppers (green, red, yellow...whatever colour you like!)
  • 3 tablespoons soy sauce
  • 3 tablespoons red wine vinegar (or red wine, or cooking sherry)
  • 1 1/2 cups extra firm tofu (cut into 1 cm cubes - or smaller if you "don't like tofu")
  • 1/2 cup sweetened dried cranberries
  • 1/4 cup chopped pecans
  • 1/2 cup grated Parmesan cheese
  • salt and pepper to taste
  • 2 cups tomato sauce
  • 1 tablespoon brown sugar

Directions:
  1. Preheat oven to 350 degrees F (175 degrees C). In a saucepan bring 3 cups water to a boil. Stir in rice. Reduce heat, cover and simmer for 40 minutes. (Alternatively, you could cook the rice in a rice cooker)
  2. Meanwhile, core and seed green peppers, leaving bottoms intact. Place peppers in a steamer and steam for about 6 minutes.  (Alternatively, you could steam them in the microwave)
  3. In a small frying pan bring soy sauce and red wine vinegar to a simmer. Add tofu and simmer until the liquid is absorbed. Combine rice, tofu, cranberries, nuts, cheese, salt and pepper; mix and pack firmly into peppers. Put peppers into a baking dish, and bake in preheated oven for 25 to 30 minutes, or until lightly browned on top.
  4. Meanwhile, in a small saucepan over low heat, combine tomato sauce and brown sugar; heat until hot throughout. Spoon sauce over each serving.

If you have leftover filling, it is delicious on its own for lunch the next day!!!

Saturday, 7 July 2012

"I'll Love You Forever" Craft

I grew up listening to the story "I Love You Forever" by Robert Munsch, and now I often read it to my daughter for her bedtime story, so I wanted to do something with it to hang in her room.

First, a picture of the final product (they will be hung after she wakes up from her nap!):

I like how they turned out, but it was a bit of a process getting here, as I will explain.

Here are the materials I started out with:
However, since I didn't like how the original product turned out, I found that I also needed a gold metallic pen, a hot glue gun, scrap fabric, and ribbon (no picture).
I got the canvas, paint, sponge brush, pen, and glue gun at the dollar store.  The letters were from Michael's. The fabric was from my closet, but originally from http://www.tonicliving.com/ - you can order a huge bag of fabric scraps for $2.50 (plus shipping).

Step One: paint the canvas in your base colour.  I did a solid colour (pink) for mine, but you could have fun with it and do a funky pattern! (no picture).  Leave it to dry.

Step Two: stick on letter stickers.
Step Three: Paint top colour over top using sponge brush (brown).  Leave to dry.

Step Four: Peel off letter stickers.  This is where the project got frustrating.  See, my stickers did NOT come off easily, and they left coloured bits of foam all over, as you can see in the "F" in the picture below.
At first, I was not impressed and almost junked the project.  But then I decided to try out my gold metallic pen as a border, and I thought it made it better.  I also found that I didn't like the canvas without a border (too boring), so I got out the big bag of scraps and my hot glue gun and made a border by folding the fabric and gluing it on.
Then I glued on some ribbon to hang the pictures by, and VOILA, it was finished!

Wednesday, 4 July 2012

Here I am

Well, here I am, embarking on an adventure as a blogger.

Why did I start a blog?  It started with a Salad-a-Day challenge for the month of June.  I decided to eat a salad every day and post a picture of it (as often as I could) on facebook.  To my surprise, many people then started asking me for recipes, or trying ideas that I had posted, and someone suggested that I start a blog...so here I am.

I figured I'd start the blog by paying homage to the salad challenge that got me here, so here's a recipe and picture of my favourite salad from the month:  The Beet-Quinoa Orange Salad! (recipe is below pictures).  You will notice that I do not include very specific measurements - that's because I don't really measure anything.  I just mix things together then taste them to see if they are yummy, then I adjust the amounts from there.  My favourite part about this salad is that the beets turn the quinoa PINK.


It's simple really - Ingredients: two beets, about 1/2 C dry quinoa, 1/2 a head of romaine lettuce, 1 orange, olive oil, balsamic vinegar.

Cook quinoa according to package directions.  Roast beets (in skin) for about 45 min, and when ready to handle, remove skins.  Put quinoa and beets in fridge to chill for a few hours.

Mix together olive oil, vinegar and a splash of juice from the orange (you may want to use salt and pepper, mustard, etc according to your tastes).  That is your dressing!

Then chop up the orange (peel removed), tear up the romaine, and mix with the quinoa and beets.  Pour over the dressing, and enjoy!

Well, I hope you enjoyed the first post!  Check ya later ;)