Wednesday, 8 January 2014

Chickpea-Brown Rice Burgers

Well, it's certainly been a while since I have posted anything here.  Gotta say, even though I make most of my recipes from scratch, it is certainly difficult to do that, raise a toddler, work part time, and keep a reasonably clean house...so, the blog gets left on the back burner.  Oh, and I'm expecting baby Cashew in July...so I've been more than a little tired lately!

Now that Peanut is getting to be a little more independent, and I've hit the 2nd trimester (read: more energy), I may be able to post more often...we'll see.  I'm trying to get Peanut more involved in cooking with me, to varying degrees of success.  Tonight she helped me make a salad - I chopped up the ingredients, and she put them in the bowl.  She loved it, and it was something we could do together.

I got this new cookbook for Christmas, so tonight we are trying out a new recipe from it, with a few changes.


Chickpea-Brown Rice Burgers

Ingredients:
2 cups cooked chickpeas (you can used canned if you want.  I cooked mine from dry, and added celery, garlic, onion and salt to the cooking water)
1 cup cooked brown rice (you could cook this in veggie broth if you wanted)
1/2 small onion
1 garlic clove, minced
2 tablespoons chopped cilantro (if you don't like cilantro, use whatever herbs you do like...the original recipe calls for parsley)
Coarse salt and pepper, freshly ground
1 large egg
2 tbsp olive oil
Burger toppings (such as tomato, lettuce, onion, grainy mustard, cheese, etc)
Burger buns (if you want...you can eat them without too)

Directions:
1) Put the first 7 ingredients into a food processor and blend on low until a thick paste forms (I got Peanut to push the button...but it scared her, so she wanted me to do it).
2) Heat olive oil in a large skillet over medium-high.  Add patties and cook until golden brown, about 4 minutes per side.
3) To serve, put the burgers on a bun (or not), and add whatever toppings you want.

We served the burgers with this salad:

Greens and Cranberry Salad

Ingredients:
Mixed Lettuce
Sliced Mushrooms
Diced tomatoes
Dried Cranberries
Sliced Cucumber
Slivered Almonds
Parmesean Cheese
Salad Dressing

Directions:
Put lettuce in a bowl.  Top lettuce with other ingredients.  Toss with whatever salad dressing you like (I enjoy balsamic).

Tuesday, 17 September 2013

Crock-pot Vegetarian Chili

Ahhhh, fall.  My favourite season.  Now that I can feel the crispness in the air, I can pull out my cozy sweaters and beautiful fall scarves.  It is also the perfect time of year to make chili.

Vegetarian Chili
I love that I can throw the ingredients into my CrockPot the night before, and I have lunch for the next day.  And the smell when I walk into the kitchen is amazing.

I got the original recipe from "The Yummy Mummy Kitchen" cookbook, which I picked up from the library last week.

Vegetarian Chili
Ingredients:
2 tbsp extra-virgin olive oil
1 onion, chopped
2 cloves garlic, minced
2 carrots, chopped
1 sweet potato, peeled and diced
Salt and pepper to taste
1 tbsp Epicure Louisiana Hot n Spicy (or you could use chili powder)
1 tsp cumin (this is important...it really improves the flavour!)
1 red bell pepper, diced
2 tbsl tomato paste
28 ounces canned diced tomatoes with herbs & spices in juice
3 cups vegetable broth (I used my homemade stuff using vegetable scraps)
1.5 C cooked kidney beans, drained and rinsed (or use 1 can)
1.5 C cooked black beans, drained and rinsed (or use 1 can)

Directions:
Put all ingredients into a crock-pot.  Cook for 8-12 hours on low.

Meal Plan for the Week:
Sunday: Vegetarian Chili
Monday: Chili Leftovers
Tuesday: Honey Curried Vegetables over brown rice
Wednesday: Stirfry over leftover brown rice
Thursday: Spaghetti with tomato sauce w/ veg and black beans
Friday: Shepherd's Pie (made with sweet potatoes)
Saturday: Leftovers

Saturday, 3 August 2013

Shrimp Pesto Pasta

Typically, my family eats vegetarian at home, but I will occasionally make a dish with seafood or fish.  I got this recipe while I was staying with my sister-in-law.  When she said she was making Shrimp Pesto, I thought "there's no way Peanut is going to like this"...but to my surprise, it was a BIG hit!  Shrimp was on sale last week, so I bought a big bag and thought I'd give it a try.

Shrimp Pesto Pasta

Shrimp Pesto Pasta
Ingredients:
1 pkg whole wheat pasta (I used rotini, but penne would be great too)
2 tbsp olive oil
1 medium onion, chopped
1 large tomato, diced, liquid drained
20-25 shrimp: raw, peeled
4-5 tbsp pesto sauce (I used Classico brand, but you could use the store brand or make your own)
salt and pepper to taste
Parmesan cheese, to taste

Directions:
Cook the pasta according to package directions.
Meanwhile, heat the olive oil in a frying pan.  Add onion, and cook until soft.
When onion is soft, add chopped tomato and shrimp.  Cook, stirring frequently, until shrimp is opaque (about 5-6 min).  Don't overcook the shrimp, or else it can get rubbery.
Once the shrimp is cooked, add the pesto, and the salt and pepper to taste. Stir it around to warm it up.
Toss the shrimp pesto with the noodles, and serve immediately.  Top with grated Parmesan cheese if you'd like.  

Friday, 19 July 2013

Rainbow Crayon Disaster

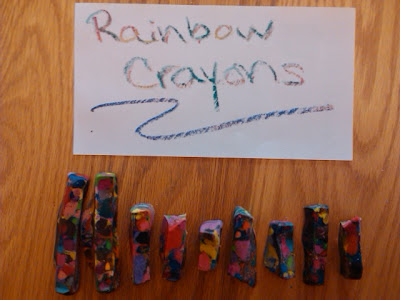
Peanut's crayons kept breaking, and we also left a couple out in the sun...which reminded me of this: rainbow crayon hearts.

So, I thought I'd give it a try.

It started out pretty well...
pretty crayon bits in silicone tray
I looked into the oven, and the meltedy bits looked so lovely and blended together.

And then I tried to take them OUT of the oven.  And with grace that only I can master, I tripped, and spilled swirly wax all over the place...'cause I'm awesome like that.

abstract art in my toaster oven
Then, in my infinite wisdom (while panicking about hot wax pouring all over the place), I set the tray on a wire rack.  Remember how the tray was made of silicone?  Did you know that silicone is NOT firm, and when hot, and full of hot wax, it can REALLY bend???  Well, it did...so, now I no longer have a useable silicone ice cube tray.

it's a little warped
But, alas, all was not lost, and I was actually able to salvage a few somewhat useable rainbow crayons...which will probably get left out in the sun to become yet another rainbow puddle (as seen above).

after all of this...peanut will probably just want to eat them anyway

The end.


Thursday, 2 May 2013

Pumpkin Carrot Muffins

I just made THE BEST MUFFINS EVER.  They turned out so nicely - moist, flavourful, fluffy :)  I got the recipe here.  The original recipe only makes 6 muffins, so I doubled it, but kept all of the ingredients the same.  Oh, and I increased the cooking time (mine were definitely not done after 14 minutes).  Next time I might consider using applesauce instead of oil, and possibly throwing in some flax seed (or using a "flax egg" instead of eggs).  But then again, maybe I should just not mess with a good thing!
Pumpkin Carrot Muffins

Here's the recipe:

Pumpkin Carrot Muffins
Ingredients:

    1 cup pumpkin
    2/3 cup brown sugar
    4 tbsp oil
    2 eggs, beaten
    1 cup grated carrots
    1.5 cup whole wheat flour
    1/2 tsp salt
    1 tsp cinnamon
    1 tsp baking soda
    2 tsp baking powder

Directions:
Beat together pumpkin, brown sugar, oil and egg. 

Add in carrots. 
In a separate bowl, blend together flour, salt, soda, baking powder and cinnamon. 
Add to the pumpkin mixture. 
Fill muffin tins about 2/3 full. 
Bake at 375 degrees for 18-20 minutes. Makes 12 muffins.

Tuesday, 2 April 2013

Homemade Laundry Soap

I have been making my own laundry soap for a while now, so since I am making a new batch today, I thought I would share the recipe.  Now, you may think I'm crazy for making this myself, but let me tell you - it is not very difficult or time consuming (takes about 10 minutes, then you leave it overnight), and it is WAY CHEAPER than buying it.

We are a family of 3, and one batch of this (2 litres...8 Cups) lasts about 2 weeks.  I would make a double or quadruple batch, but I don't have the containers....I totally recommend you make larger batches!

Here's the cost breakdown:
These ingredients will last me about a year for my family of 3, except for the bars of soap, which last for 2 months each (6 bars per year).  So, do the math, and that works out to be about $3.25 per month.  NOT BAD :)

Here's the recipe.  I got the original idea from here, but I made some changes.  She does a great job explaining it though!

Homemade Laundry Soap
water
1/4 bar grated soap (I use soapworks, but try whatever you want)
1/2 C borax
1/2 C washing soda (NOT baking soda)
10-15 drops lavender essential oil

Directions:
1) Boil some water.  Remove the pot from heat.  Dump in the soap flakes, and stir until melted (about 30 sec).
2) Add the borax and washing soda.  Stir until dissolved.

3) Add the lavender oil (smells nice and has antibacterial qualities!).  It will smell strong at first, but after it cools, the scent is actually very light.  Add more or less if you like.  You could use a different scent or no scent at all if you'd like.
4) Pour the liquid into a container...I use a large juice pitcher.  Shake it up or stir it.
5) Let it sit for a few hours, or overnight.  It will harden to be like jelly.  Then mash it up (I use a potato masher), or give it a good shake.  Add more water to fill the container, then mash/shake it again.  DONE!


NOTES:
-I use about 1/2 C per load, with warm water.  I like to mix it with a bit of water first to dissolve it a little.
-it won't bubble much because it doesn't have the bubbling chemicals in it.  THIS IS FINE - it will still clean.
-great for HE machines because of the lack of bubbles!

Wednesday, 20 March 2013

Breaded Lime Tilapia

I actually remembered to thaw my fish in advance this week, so that I could try a new recipe! (you can't do this if they are frozen).  I wanted something simple and light tasting, and something that Peanut would like.  I came across a recipe for "Lemon Sole" in my current favourite recipe book, "Healthy in a Hurry", and adapted it for the ingredients I had at home.  Aside from thawing the fish, it took about 8 minutes to prep, and about 8 minutes to cook.


Here's the recipe:
Breaded Lime Tilapia

Ingredients:
1 C bread crumbs (I made my own by putting a few slices of slightly stale bread in the food processor)
Zest of 1 lime (or less if you don't want it to "limey")
Sprinkle of salt\
Sprinkle of pepper

1 large egg

6 tilapia filets, thawed (or fresh)

Directions:
1) Preheat oven to 400F.  Grease a cookie sheet.
2) Mix the first four ingredients together in a shallow bowl.
3) Whisk the egg in a separate shallow bowl.
4) Dip each filet (one at a time) into the egg, then into the bread mixture (ensuring that both sides get covered).  Lay each filet on the greased cookie sheet.\
5) Bake for 5-10 minutes (check at 5, then add time if needed - you will know they are done if the fish is white and flaky).
6) EAT!

I served this with quinoa and some roasted peppers and apples.  I really liked the flavour, and it was so easy!  WAY better than buying the gross breaded fish from the store.