Thursday 20 December 2012

Easy Macaroni and Cheese

I am a big fan of avoiding processed food, so KD does not make it into our home very often.  This recipe takes a little more effort than KD, but is way more delicious.

Easy Mac and Cheese

Ingredients:
2 C uncooked macaroni (whole wheat)...this is 1 regular sized package
1 tbsp butter
1 egg, beaten
1 tsp mustard
1 C milk
3 C shredded cheese (whatever flavour you like!  I often do 1/2 Cheddar and 1/2 Monterrey Jack) (this is approximately 1 500g block of cheese)

Directions:
1) Preheat the oven to 350 degrees F (175 degrees C). Grease a 9x13 baking dish or a casserole dish with nonstick cooking spray.

2) Bring a large pot of lightly salted water to a boil. Add the macaroni and cook for about 8 minutes, it should still be a little bit firm. Remove from the heat, drain and return to the pan; stir in the butter, egg and mustard until pasta is evenly coated. Reserve 1/2 cup of cheese and stir the remaining cheese and milk into the pasta. Spoon into the prepared dish. Sprinkle the reserved cheese and the over the top.

3) Bake for 30-35 minutes in the preheated oven, or until the topping is nicely browned.  Allow to cool for a few minutes before serving.

Serve with steamed vegetables or a delicious fresh salad!

Saturday 15 December 2012

Tomato Barley Soup

I just made this delicious soup in my crock-pot.  Matt liked it so much that he didn't even add hot sauce to it, and he adds hot sauce to EVERYTHING.  Peanut loved it too!  I just blended it up and gave it to her for lunch today, and it was a big hit.

Tomato Barley Soup
When I make soup, I almost never use a recipe - I just throw in whatever ingredients I have in my house, or happened to be a good price in the grocery store.  So, I didn't use a recipe for this either, but I'm really happy with how it turned out, so I'm going to kind of make it up right now.

Tomato Barley Soup (or Stew)

Ingredients:
1 can of no salt added crushed tomatoes
6 or 7 cups of low sodium vegetable broth (I use epicure)
2 or 3 carrots, peeled and chopped
4 stalks celery, chopped
2 or 3 potatoes, peeled and chopped
1 small onion, chopped
1 cup pot barley (or pearl barley, but pot barley is less refined)
salt and spices to taste (I used a few tbsp of Epicure Herb and Garlic Dip Mix)
(other suggestions - add some red lentils, sweet potato, or pasta [at the end] to change it up a bit)
Directions:
Put everything into a crockpot.  Cook on low for 8 hours (or overnight), or on high for 4 or 5 hours.

EASY!

Tuesday 27 November 2012

Make Ahead Vegetarian Lasagna

I'm a big fan of easy recipes, and also a big fan of making things ahead so that all I have to do is pop them in the oven!  So, here is an easy AND make-ahead vegetarian lasagna!  (found on a milk ad in the November 2012 issue of Canadian Living magazine).  Prep time is about 20-25 minutes (including cooking the cream sauce), then you need to let it sit in the fridge for 8-24 hours.  I got all of the prep, dishes washed, and typed this blog while my 8 month old had her nap :)

Make Ahead Vegetarian Lasagna

Ingredients:

¼ C all purpose flour
2 tsp dried Italian herb seasoning
½ tsp pepper
2 C half-and-half cream
2 C low-sodium tomato pasta sauce (1 1/2 C, then 1/2 C later)
1 C water (1/2 C, then 1/2 C later)
12 Lasagne noodles
2 pkg frozen Mediterranean vegetables
1 ½ C shredded mozzarella (or provolone) cheese (3 x 1/2 C)

Directions:
1) In a saucepan, whisk together flour, herbs, and pepper.  Gradually whisk in cream.  Bring to a boil over medium heat, whisking often.  Reduce heat and simmer, whisking, for 2 minutes or until thick.  Remove from heat; whisk in 1 1/2 C pasta sauce and 1/2 C water.

2) Pour 1/2 C pasta sauce and 1/2 C water into a buttered 9x13 glass baking dish; stir and spread evenly.  *Arrange 4 uncooked lasagna noodles on top of sauce, breaking to fit.  Spread 1/3 of the tomato cream sauce on top of noodles.  Sprinkle 1 pkg vegetables on top of sauce.  Sprinkle 1/2 C shredded cheese.  Repeat from * once.  Top with a layer of noodles, then the rest of the sauce, then the rest of the cheese.

3) Cover with foil and refrigerate for at least 8 hours, or up to 24 hours.

4) Bake lasagna, covered, in 375F oven for about 40 min, or until hot, bubbling and noodles are tender.  Uncover; bake for 10 min, or until topping is browned.  Let stand 10 min before serving.

Moroccan Tomato Soup - EASY

Today I am making Moroccan Tomato Soup in my Crock-pot.  I got this recipe from the November 2012 issue of Canadian Living magazine.  It is SO EASY, and it's making my kitchen smell amazing :)

Ingredients:
2 onions, chopped (I used my tupperware quick chef pro...I LOVE that thing)
2 cloves garlic, chopped
2 tbsp packed brown sugar
2 tsp chili powder
1 tsp ground cumin
1/2 tsp pepper
1/4 tsp each salt and cayenne pepper
Pinch cinnamon
1 can chopped tomatoes (I used the Life Smart brand with No Salt Added)
2 C water
1/4 C tomato paste
1 tbsp red wine vinegar
3/4 C smooth peanut butter (EDIT - I know this seems like a weird ingredient, but believe me, it doesn't taste like a "tomato and peanut butter sandwich" as a friend of mine thought it might.  Give it a try - it's delicious!)

Directions:
In a slow cooker, combine all of the ingredients EXCEPT the peanut butter.
Cover and cook on low for 5 to 8 hours.
Add peanut butter; using immersion blender (stick blender...or whatever kind of blender you want really), puree soup until smooth.

THAT'S IT!  ISN'T THAT EASY???

And the other great thing is that this soup is totally freezer friendly, so go ahead and make a double batch!  (remember to leave 1 1/2 inches of head space in your air tight container because liquids expand when they freeze).

ENJOY!

Thursday 20 September 2012

Baby Things I Love: The Baby Carrier (Comparison: Moby Wrap, Snugli, Heart2Heart Sling)

If someone asked me what is the ONE baby item I think every mother should have, it is a baby carrier.  Baby wearing is beneficial to both mother and baby because in increases skin-to-skin contact, it is relaxing to baby, mom gets to snuggle, mom can get a few things done while also holding baby, it's easier to carry than a car seat, etc. etc. etc.

I have three different baby carriers (two were gifts, and one I bought for $10...amazing, right?).  I have a Heart2Heart sling, a Snugli, and a Moby Wrap.

The Moby is by far my favourite.  It can be a little difficult to put on at first, but once you get the hang of it, it's easy as pie.  Also, it is SO COMFORTABLE, and pretty easy on the back.  If I know I will be carrying her for a long time, I always bring the wrap (actually I usually wrap it on at home, then just wear it around for the day taking Peanut in and out as the day goes on).

However, I also like the Snugli.  I keep this one in my car because it is really great to have when I want to stop at a store and don't want to lug her around in her car seat.  It is fairly easy to get on quickly without the straps dripping into the mud (like the Moby Wrap tends to do).

I do not generally care for the sling as it makes my back hurt because the weight distribution is lopsided.  I do keep it in the closet at home though for those times when I only need to carry peanut around for a few minutes.

See the chart I've made below comparing my experience with each of these carriers*.
The first time Peanut went in the moby wrap.  Yes, there is a baby in there - see her sleepy little head on my chest?


Moby Wrap
Snugli
Heart2Heart
Ease of Use
Easy with some practice
Easy once you know where the straps go
Very Easy
Comfort
Extremely comfortable.  Does not dig in anywhere.  “Straps” can be spread out to evenly distribute weight on back, shoulders and hips.
Fairly comfortable, but over time can dig into shoulders and make back sore.  Weight is distributed fairly well over shoulders and hips.
Somewhat comfortable for short use, but made my back hurt over time.  Weight is unbalanced over one shoulder, making posture lopsided.
Versatility
Extremely versatile.  Can be worn on front, hip or back.  Baby can face in or out when on front.  Can also be used for hands-free breastfeeding (though I have not figured out how to do this, and Peanut does not seem to enjoy this a whole lot).
Quite versatile.  Can be worn on front or back, and baby can face in or out when on front.  Cannot be used on the hip unless you get that specific version (and Peanut LOVES the hip hold).  Easier to get onto the back than the Moby, but less comfortable.
Not versatile.  Can only be used slung over one shoulder.  The baby can either be held in the cradle hold or upright position, but there is little room for shifting from front-back-hip.  However, I do like using this one at home when I know it will only be for a short time and I just want to carry Peanut on my hip for a few minutes while I put some things away or vacuum.
Peanut likes it
LOVES it!  She is always content when in the Moby, no matter what position she is in.  If she is grumpy, she will calm down, and if she is tired, she will fall asleep within minutes.  When she was a newborn, this wrap was a gift from heaven allowing me to get some rest in the recliner while Peanut had a nap in the wrap.  LOVE LOVE LOVE.
Likes it.  She enjoys riding around in the Snugli while we are doing errands around town.  However, when she is tired it takes her much longer to fall asleep and sometimes she does not sleep at all.  I think it is because there is nothing to hold her head in place, whereas with the wrap I can tuck her head in against my chest.
When she was a newborn she DISLIKED the sling a LOT.  When I would put her in it, she would just cry.  However, now that she can hold herself up, she enjoys riding around on my hip at home.

Peanut is so cozy in the wrap.
*Note: I am NOT PAID by any company.  Everything I say here is based on my own personal experience.

UPDATE: Peanut is now 11 months old, and I am still using all three wraps for different reasons.  The Moby Wrap is still definitely number 1, simply because it is SO comfortable.  However, I have learned that stretchy wraps are NOT SAFE to be worn on the back, which means that I can't do things like cooking with her in the Moby.  For that, I use the Snugli - once you figure out where the straps go (and baby has good upper body strength), it's like carrying the baby in a backpack!  I love it!

Monday 17 September 2012

Meatless Monday - Fettucine with Creamy Mushroom and Bean Sauce

We had company over for dinner, so I decided to use them as "guinea pigs" for this recipe.  Unfortunately, I was so caught up in conversation that I forgot to take a picture.  But let me tell you, this meal was DELICIOUS!  I served it with the Chick Pea Salad from a previous post.

I got the recipe from one of my FAVOURITE cookbooks: "Gourmet Vegetarian: The Vegetarian Recipes You Must Have" by Jane Price.
Reasons why I love this cookbook:

  1. The pictures are beautiful and inspiring.
  2. The recipes are interesting.
  3. Everything I have tried so far has been delicious.
  4. Even though it is says "gourmet", the most of the recipes use ingredients that I can buy at a small town grocery store.  There are some things that you would need to get in the city or at an Asian market, but most of the ingredients are pretty easy to find or can be easily substituted.
Okay, here's the recipe:

Fettucine with Creamy Mushroom and Bean Sauce
Ingredients:
  • 280g (10oz) fettucine
  • 1/4 C sundried tomatoes
  • 250g (9oz) green beens, trimmed
  • 1 onion
  • 250g (9oz) mushrooms
  • 2 tbsp oil
  • 2 garlic cloves, crushed
  • 125ml (1/2C) white wine
  • 310ml (1 1/4C) whipping cream
  • 125ml (1/2C) vegetable stock
  • 1 egg
  • 3 tbsp chopped basil
  • 100g (2/3C) pine nuts, toasted (see NOTE)
  • 50g (1 3/4oz) shaved parmesan cheese
  • sprigs of fresh herbs (optional)
NOTE: toast the pine nuts in a dry frying pan over medium heat, stirring constantly, until they are golden brown and fragrant.  Watch carefully as they will burn easily.

Directions:
  1. Cook the fettucine in a large saucepan of rapidly boiling salted water until al dente.  Drain, return to the pan and keep warm.
  2. Cut the sun-dried tomatoes and beans into thin strips.  Chop the onion and thinly slice the mushrooms.
  3. Heat the oil in a large heavy-based frying pan.  Add the onion and garlic and cook over medium heat for 3 minutes, or until softened.  Add the sliced mushrooms and cook, stirring, for 1 minute.  Add the wine, cream and stock.  Bring to a boil then reduce the heat and simmer for 10 minutes.
  4. Lightly beat the egg in a small bowl.  Stirring constantly, add a little of the cooking liquid.  Pour the mixture slowly into the pan, stirring constantly for 30 seconds..  Keep the heat low because if the mixture boils, it will curdle.
  5. Add the beans, basil, pine nuts and sun-dried tomatoes and stir until heated through, then season to taste.
  6. Serve the sauce over the pasta.  Garnish with the parmesan shavings and sprigs of fresh herbs, if desired.

Thursday 13 September 2012

Baby Sleep - Is my baby normal???

Little Peanut is 5 1/2 months old now, and is a pretty good sleeper in general.  She sleeps really well through the night (usually 11 hours), and she usually goes down easily for naps.  Her naps, however, are rarely over 1 hour (1 hour in the morning, 1-1.5 hours in the afternoon, and 30 min around dinner).  I've always heard of these babies that sleep for 2-3 hours, so here are the questions I've been struggling with lately:

  • Is my baby normal?  (I think all mothers ask themselves this question about pretty well everything)
  • Is she getting enough sleep?
  • How many naps should she have each day?
  • How long should each nap be?
  • If she wakes up before I think her naptime should be over, should I let her "cry it out" until she falls back to sleep or until the time is up?
  • Should I trust that her instincts will wake her up when she has had enough sleep?
  • Do I enforce a napping schedule, or do I just go with what her needs are?
  • and many many more questions...
1 week old - Peanut slept about 13 hours per day for the first few weeks.  This was definitely NOT enough, and I was one tired mommy.

Anyway, thanks to my Aunt L who sent me this link http://www.babysleepsite.com/, and some other research I've done, I have discovered that Peanut IS in fact NORMAL!
1.5 months
What I've learned is that babies 6 months and younger need 11-12 hours at night, and 3-4 hours during the day in 3-4 naps.  Babies 6 to 9 months need 11-12 hours at night, 2-3 hours during the day in 2-3 naps.    So, Peanut is right on schedule - 11-12 hours at night, with 3 naps that total about 3 hours (usually).

3.5 months - she was sleeping about 8 hours at night at this age, and "sleeping on demand" throughout the day.
Because I thought she wasn't getting enough sleep, I was trying the "cry-it-out" approach, but that didn't seem to be making either of us any happier.  She went from waking up somewhat grumpy, to being nearly inconsolable, and this just made my heart BREAK (yes, I know I will have to be stern and let her cry and be frustrated at times, but I don't think this is the time for us).  Besides, she is usually a content baby, so I'm not really sure why I thought she wasn't getting enough sleep.  Also, I tend to take a more child-centered approach to parenting, and I believe that babies have instincts that help them get the amount of sleep that is right for them.  It's my job (at this point) to recognize what those needs are.  Now, you may disagree with my philosophy, and if you do, that's totally fine by me.  You need to do what works for YOU and YOUR baby :)  But, I'VE decided that for now, I don't want to enforce a napping schedule that doesn't seem to be meeting Peanut's needs.
Her normal state of being these days! (5 months)
Anyway, that is my take on my own situation.  I am by no means any kind of expert, and I know that my way is not the only right way, but hopefully my experience will help someone out, or perhaps spark some discussion that will help someone out there!  Feel free to post comments about your experiences with baby sleep!

Tuesday 11 September 2012

Oat Baby Biscuits

Peanut has been eating solids for a while now, but has had some trouble with going #2...so, we're trying to avoid rice for a few days to see if that helps.  That means she can't nibble on baby mum mums, so I decided to make some oat baby biscuits.

She tried them this afternoon, and they were a hit!  I like that as she gums them they get mushy, so not a big choking risk, but they can break off in pieces, so babies should ALWAYS be supervised while eating them (and while eating in general, of course!).


Here's the recipe!

Oat Banana Baby Biscuits

Ingredients:
1 c quick oats
1 c ground oats (grind oats and make a coarse oat flour)
1/4 t salt
1 t baking powder
1 c (~2) overripe bananas, mashed
1 t vanilla extract
3 T oil of choice
Directions:


Mix dry, mix wet, add wet to dry. Drop by the spoonful onto parchment paper or greased baking sheet. Bake 12-15 min at 350.

**Update:  Avoiding rice did not solve the #2 problem.  Even so, Peanut really likes the biscuits, so I will continue making them.**

Monday 10 September 2012

Meatless Monday - Lentil Kale Soup

I did a bunch of batch cooking on the weekend: shepherd's pie, stuffed zucchini, cheesy "beef" noodles, stuffed pasta shells, and today's feature recipe...Lentil Kale Soup!  Look forward to enjoying some of the other recipes in future posts!

This soup is hearty, flavourful, and packed with protein and vitamins!  And it's easy to make!

Unfortunately, in all of my excitement over this delicous soup, I forgot to take a picture.  So, instead, here's a picture of my empty bowl (proof that I enjoyed it!).

Lentil Kale Soup (adapted from Today's Parent Magazine Sept 2012)
Ingredients:
1 small onion (chopped)
2 carrots (peeled and chopped)
2 stalks celery (chopped)
2 cloves garlic (minced)
1/2 tbsp paprika
3 tbsp tomato paste
1 1/2 C green lentils (dry)
8 C low sodium vegetable stock (I used epicure) (could use chicken stock)
1 tbsp chopped fresh thyme
1 bay leaf
4 C chopped kale (stems and mid-ribs removed)
1 1/2 tsp salt
2 tbsp chopped parsley (optional for garnish)

Directions:
1) Heat oil in a large pot over medium.  Add onion, carrot and celery and saute for 5 min or until vegetables begin to soften.  Add garlic and paprika and saute for 1 min.
2) Stir in tomato paste.  Add lentils, stock, thyme and bay leaf and bring to a boil.
3) Cover pot, turn heat to low and simmer gently for 15 min.
4) Add kale and salt and simmer for 15 min longer or until lentils and vegetables are cooked through.
5) Sprinkle with parsley just before serving.

Tuesday 28 August 2012

Meatless Monday - Egg and Potato Skillet

Ahhhh - I missed Monday again!  I need to get on the ball here.

Anyway, here's your recipe for the week!

Egg and Potato Skillet

This was one of those meals where I was hungry and the fridge was getting bare, so I just looked around and made something up with whatever I had.

A great thing about this meal, is it can be made with mostly food out of your garden, and if you live in a rural area, you can probably find a local farmer to get your eggs from too!  Also, you only need one pan!

Ingredients: (makes 2 servings)
vegetable oil
2 potatoes
1 onion
1 green pepper
1 tomato, chopped - drain off some of the liquid
4 eggs
herbs (I used the epicure herb and garlic mix - you could use oregano, basil, rosemary...whatever you like!)
shredded cheese (a few tbsp) - I used parmesean, but any kind of cheese would be good!
As you can see here, I added the tomatoes before the egg, but I would recommend doing eggs first.  The tomatoes really don't need to cook that long.
Directions:
1) Chop up all of your veggies, but don't mix them together.
2) Heat the oil in a skillet (medium heat).
3) Add the potatoes to the skillet.  Fry them until they start to get soft (about 10 minutes), stirring frequently.
4) Add the onions and peppers to the potatoes.  Stir fry until the onions start to get soft.
5) Meanwhile, crack the eggs into a bowl, mix in the herbs, and whisk the eggs.  You may want to add some milk in as well, but I generally don't.
6) Add the eggs to the pan, and stir them up as they cook (making scrambled eggs).
7) When the eggs are mostly cooked, add in the tomatoes.  Keep frying until the eggs are all firm and there is no eggy liquid left.
8) Put the mixture onto a plate or bowl, then top with shredded cheese.  If you used a cast iron skillet you could just eat it right out of the pan, but I find that the pan is a little hot, so I didn't do that.

ENJOY!

Saturday 25 August 2012

Ironic Article

I was searching meatless monday ideas online, and ironically I came across this article that is written by someone named Carmen Cox.  Clearly it is not me, as it is an American article...but interesting nonetheless.
Meat Industry Has Beef with Meatless Monday, Forces USDA Retraction

Monday 20 August 2012

Meatless Monday: Udon Noodle Stir-fry

First, I will apologize to those of you who have been following this blog and looking forward to a post last Monday.  I went to visit my mom for a week, and totally forgot to post a recipe!

But no worries, I am back :)

This weeks recipe was inspired by my mother-in-law, who introduced me to the deliciousness of Udon Noodles.  These Asian noodles are kind of like thick spaghetti, but softer.  I like to use them in stir-fries, so this week I am featuring a REALLY EASY stir-fry that ANYONE could make.  And it's really inexpensive too!  A great meal for those of you who will be going to college or university next month!

Here it is!
I know it may not LOOK that amazing, but it's really yummy.

Udon Noodle Stir-Fry (this recipe makes 1 serving)
Ingredients:
1 tbsp olive oil
Extra-Firm Tofu, cut into 1 inch cubes - about 1/4 of a pack)
Chopped veggies of your choice (I used 1/4 red pepper, 1/4 yellow pepper, 1 thick slice eggplant, 1/4 onion, and 1 portabella mushroom)
Udon Noodles (I got these from Zehrs for about $0.35)

Asian Sesame salad dressing (I like Renee's) - 1 to 2 tbsp

Directions:
1) Heat the olive oil in a wok or frying pan (medium heat).
2) Add the onion and cook until it starts to soften.  Then add the rest of the veggies and the tofu.  Cook until the veggies are tender-crisp.

3) Add the noodles and the dressing.  Cook until the noodles and dressing are heated through.
4) That's IT!  You're done!  Eat!

Monday 6 August 2012

Meatless Monday - Zucchini Patties, Yogurt Sauce, and Chick Pea Salad


My husband and I went to the farmer’s market last week for an outing with Peanut and to sample some of the local fare.  There is nothing like fresh Ontario produce in August!  We picked up some zucchinis (as well as tomato, onion, berries, peaches...etc. etc. etc.), so I needed to find something to feature these delicious treats!  Enter Zucchini Patties and Chick Pea Salad!

Zucchini Patties (makes about 12 patties)

Some of the Zucchini Patties with the Yogurt Sauce
I served these to my in-laws for dinner on Friday – they were a BIG HIT!  So yummy!  I also reinvented the leftovers for breakfast the next morning!

For breakfast the next morning I at the leftover patties.  Instead of yogurt sauce, I melted white cheddar on top, then placed them on top of a delicious slice of Ontario tomato, and some greens - mmmmmmmm!

Ingredients:
½ C grated carrot
½ C chopped onion
½ C green pepper (or do ¼ C each red and green pepper)
2 C fine soda cracker crumbs (I made mine in the food processor)
¼ C all purpose flour (...I wonder how it would work out with WW flour...)
1 tsp baking power
¾ tsp salt
Pinch of pepper

3 C grated zucchini, with peel
2 large eggs, fork-beaten

Vegetable oil cooking spray (or 2 tbsp cooking oil)

Directions:
1)      Measure the first 9 ingredients into a large bowl.  Stir.
2)      Mix in zucchini and eggs.  With damp hands, shape into patties using about ¼ C of mixture for each patty.
3)      Spray and heat pan.  Brown patties on both sides – I did mine on medium heat for 4-5 min per side.  I used a grill, but if you don’t have one, a frying pan will do nicely.  Just heat up the oil in the pan first, then brown the patties.

Cook the patties until they are nice and golden like this!
Yogurt Sauce (to put on the patties):
I’m not sure how much of each I used, but this is what I put in it...

Plain greek yogurt (regular yogurt will do as well)
Lemon juice (just a small squeeze)
Herb and Garlic seasoning (I used Epicure)

Chick Pea (Garbanzo Bean) Salad (serves 6-8):

Even though I don’t generally care for onion, I LOVED this salad.  It wasn’t a huge hit with the in-laws, but then again I didn’t know that Jim doesn’t care for tomatoes OR olives...he was so polite, however, that he ate it anyway and I didn’t find out until Matt told me later...how someone goes through life without liking tomatoes is beyond me – I used to eat them like candy, but have since decided that the canker sores are not worth the over indulgence.  Annnnnyway....here’s the recipe.
Delicious chick pea salad with local zucchini, tomato, red onion, and basil!

Ingredients:
1 ½ C dried chickpeas
1 medium zucchini
1 large tomato
1 small red onion
3 tbsp chopped flat-leaf parsley
½ C sliced kalamata olives

Dressing:
1 tbsp lemon juice
¼ C olive oil
1 garlic clove, crushed
1 tsp honey

Directions:
1)      Place the chickpeas in a large bowl and cover with cold water.  Leave to soak overnight.
2)      Drain the chickpeas, place in a saucepan, cover with fresh water and cook for 25 minutes, or until just tender.  Drain and leave to cool.
***you can skips steps 1 and 2 by using canned chickpeas, but keep in mind that the sodium content is much lower when using dried.  If you opt for the canned version, I suggest looking for “no salt added”***
3)      Cut the zucchini in half lengthwise and cut into 1 cm slices.  Cut the tomato into cubes roughly the same size as the chickpeas.  Finely chop the onion.
4)      Combine the chickpeas, zucchini, tomato, onion, parsley and olives in a serving bowl.
5)      To make the dressing, combine all the ingredients.  Pour over salad and toss lightly to combine.  Serve at room temperature.

Thursday 2 August 2012

Chocolate Peanut Butter Pops - Kid Tested, Parent Approved!

I was babysitting a friend's girl this week (K), and she finished off my last "Trop Pop" - so it was time to make some more!  I asked K what kind she would like next, and of course she said CHOCOLATE!  So, I decided to make Chocolate Peanut Butter Pops.

The great thing is that they are creamy, chocolately goodness that kids LOVE, AND they are full of good stuff that parents love!

Here's the recipe:

3 frozen bananas
2 tbsp cocoa
1 or 2 heaping tbsp peanut butter (I used all natural pb)
about 1/2 C soy milk (use whatever kind of milk you want)

Blend together and freeze in molds!

Here are the results:
Hmmmm...what do I think?

Delicious!

Can I have another one?

Peanut liked them too!

Monday 30 July 2012

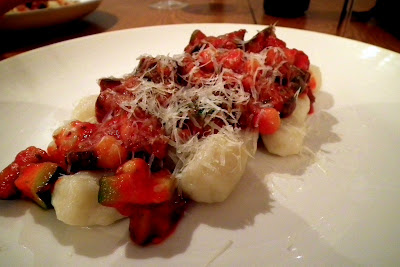
Meatless Monday - Potato Garlic Gnocchi

Gnocchi - first of all, it is not pronounced "gah-nok-chi", or any variation of that.  The only somewhat accurate, but easier way of saying it is "naw-kee", but if you really want to get it right try "nyawk-kee"

Well, now that we've got that sorted out...what IS gnocchi?  It's more than one of those things you see on the menu at Italian restaurants and think "ummmm...I have no idea what that is...so, I'll just have the chicken fingers".

It's basically little potato and flour dumplings, though they can be made with many different kinds of veggies instead of potatoes.  I've made them with squash, and also with spinach - perhaps I will make one of these variations to use as a future recipe.  But, for today, we're going with a basic potato gnocchi, with a bit of garlic thrown in there for interest.  See, not scary at all.  Really quite simple, actually...as you will see below!


Here it is, folks:

GNOCCHI:
Ingredients:
3 or 4 regular sized potatoes - I like yellow, but any kind will do.
1 or 2 cloves of garlic
1/2 tsp salt
1 egg
2 cups of all purpose flour (I normally would do 1 cup each of whole wheat all purpose, but I was out of ww, so this is what I did)

Directions:
1) Peel the potatoes and cut them into chunks.  Steam the potatoes until soft (approx 25 min)
2) Mash the potatoes until smooth.
3) Mix in the garlic, salt and egg.
4) Mix in the flour a little at a time until you have soft dough (imagine pizza dough). Use more or less flour as needed.
5) Bring a large pot of lightly salted water to a boil. While you wait for the water, make the gnocchi. On a floured surface, roll the dough out in several long snakes, and cut into 1-inch sections. Gently roll each section with a fork (the grooves help the sauce stick better).  Drop the pieces into the boiling water, and allow them to cook until they float to the surface.  This will only take about 2 minutes!   Only do as much of the batch as will fit nicely in the pot, leaving room for the pieces to float up.  Remove the floating pieces with a slotted spoon, and keep warm in a serving dish.  Then repeat the process for the next batch.  Serve with sauce (below).

SAUCE:
Ingredients:
2 tbsp oil
1/2 onion
1 zucchini, chopped
4 or 5 mushrooms, sliced
1 C chick peas
1 jar of tomato sauce
a splash of soya sauce
a squeeze of BBQ sauce
chopped fresh herbs (I like basil and oregano...dry will work great too!)...to taste

Directions:
1) Heat the oil in a frying pan (medium heat).
2) Saute the onion until it starts to get soft.  Add the zucchini and mushrooms.  Cook until they start to soften up.
3) Add the chick peas; tomato, soya and BBQ sauces; and the herbs.  Turn the heat to medium-low, and cook until the sauce is warmed through.  *Optional - if you let it simmer for 10 min or so, on low, the flavours will blend more, but the zucchini will be very soft.
4) Serve over gnocchi (or whatever kind of pasta, really).  Top with grated Parmesan (optional).

ENJOY!  If you try this, leave a comment below to let me know how it goes!

Monday 23 July 2012

Meatless Monday - Tortellini Salsa Rosa and Detox Salad

It's Meatless Monday!  Today's recipe is Tortellini Salsa Rosa.

This recipe was inspired by a menu item at "The Cajun Pepper" restaurant in Chatham, ON.  It's a twist on a standard Rosé sauce, using salsa instead of tomato sauce - a great addition to a mexican themed family night!

So, here's the recipe:

TORTELLINI SALSA ROSA
Ingredients:
Tortellini (or cappelletti...same thing)

Alfredo Sauce (I used a dry mix - need to add milk and margarine.  Or you could buy a can of sauce, or make your own)

Salsa (I made my own using tomato, pepper, onion, lime juice, and epicure mix...but you could just buy a can)

Directions:
1) Make tortellini according to package.
2) While tortellini is cooking, make alfredo sauce according to package.
3) When sauce is cooked, add salsa and stir it in.
4) Pour the Salsa Rosa sauce over the tortellini!  Yup, it's that easy!!!

DETOX SALAD
Now, I won't claim to have come up with this on my own.  I was inspired by this recipe: Oh She Glows Detox Salad
Ingredients:
Broccoli (1/2 bunch)
Cauliflower (1/2 head)
Carrot (1 large)
Yellow Pepper (1/2)
Parsley (a small handful)
Raisins (handful)
Sunflower Seeds (handful)
Honey (drizzle)
Lemon Juice (1 to 2 tbsp)

Directions:
Chop up all of the veggies and parsley (I used my handy tupperware chopper)
Throw in the sunflower seeds and raisins.
Pour in honey and lemon juice.
Stir and serve.  Best if cold.

Thursday 19 July 2012

Trop Pops!

This summer I made the best impulse buy of my life (okay...maybe I'm exaggerating, but it WAS really a good buy)...a popsicle tray for $1.99 at Zehrs!  I thought, maybe I'd occasionally make a treat for the nieces and nephews when they would come over or something...but once I started, I realized that I could make
HEALTHY frozen treats
that
actually satisfied my craving for ice cream!!!

I love the fun summer themed handles on my popsicle tray.

The secret???

Frozen Bananas.
They are so creamy, and can be blended with just about anything.  So, whenever I have a banana or two that have ripened more than I prefer, I pop them in the freezer to be pureed into the next popsicle batch.

To make delicious, healthy popsicles, just blend together anything that you would put into a smoothie, pour into molds, and freeze (takes about 4 hours).  Don't have molds???  No problem!  Just pour them into small glasses and stick popsicle sticks in from the dollar store.  To hold the sticks in place before freezing, just put plastic wrap over the glass, then poke the sticks through.

But, if you need some inspiration, here's the "recipe" for the popsicles I just made: "Trop Pops".  (Note: measurements are very rough...I just throw whatever looks like the right amount into a bowl, then blend).


Trop Pops
2 frozen bananas (peeled)
1 ataulfo mango (peeled, and cut off the pit)
1 large dollop of coconut yogurt
2 large dollops of plain 2% yogurt
1/2 can pineapple tidbits with some of the juice

Directions: Put everything into a bowl and use a stick blender to puree it.  If you like texture in your popsicles, leave chunks.  (You could also use a regular blender or food processor).  Then pour into molds and freeze.  Wait 4 hours, then eat them.

*makes about 7 popsicles, with some leftover for a delicious smoothie!

Monday 16 July 2012

Meatless Monday - Vegetarian Shepherd's Pie

This is a delicious, hearty meal.  It's a good one to try if you do not eat a lot of vegetarian meals, or if you are not familiar with lentils.  It's also a nice meal to make if you are having non-vegetarian company for dinner because it is still a "meat-and-potatoes" kind of dish.  You can make it in a large casserole dish, but sometimes we like to make individual mini-dishes for something "fancy".

...this is just a picture of shepherd's pie, not MY recipe (I forgot to take a picture).  I will replace the picture when I make this again.
Ingredients:

  • 8-10 large or medium potatoes (I prefer red or yellow)
  • 2 tbsp margarine
  • 1/2 C milk (I use soy milk, but any kind will do)
  • Salt to taste
  • 2 tbsp olive oil
  • 1 large onion, chopped
  • 2 cloves garlic, minced
  • about 10 cremini or white mushrooms
  • 2 15-oz cans of lentils, drained (not rinsed), or 3 1/2 C cooked green lentils with a bit of liquid reserved*
  • 1 or 2 tbsp soy sauce
  • 2 tbsp seasoning blend (e.g. a ClubHouse mix, Epicure, Mrs. Dash, etc)
  • black pepper to taste
  • 3 tbsp cornstarch
  • 1 1/2 C frozen peas or corn, thawed

Directions:
  • Peel and dice the potatoes. Place in a large saucepan with enough water to cover. Bring to a simmer, then cover and simmer until tender, about 20 minutes. Drain and transfer to a small mixing bowl
  • Stir the margarine into the potatoes until melted, then add the milk and mash until fluffy. Cover and set aside until needed. Preheat the oven to 400 degrees.
  • While the potatoes are cooking, heat the oil in a medium skillet. Add the onion and sauté over medium heat until translucent. Add the garlic and mushrooms and continue to sauté until the onion is golden.
  • Add the lentils and their liquid and bring to a gentle simmer. Stir in the optional soy sauce, seasoning blend and pepper. Cook gently for 5 minutes. Combine the cornstarch with just enough water to dissolve in a small container. Stir into the lentil mixture.
  • Mix the frozen peas or corn into the lentil mixture.
  • Lightly oil a casserole dish.  Pour in the lentil mixture, then spread the potatoes evenly on top.
  • Bake for 35-40 minutes (or until the potatoes start to turn slightly golden and crusty).
  • Take out of the oven and let cool for 5-10 minutes.
  • Cut into squares or wedges and serve!  Enjoy!

*Cooking lentils is EASY.  You can cook them in your rice cooker or a pot, just like rice.  No need to pre-soak or anything.

Thursday 12 July 2012

Chopped Salad with Avocado Dressing

I realized today that the avocado that I bought the other day was almost too ripe.  I needed to use it right away, so I whipped up this salad to accompany the pizza we were having for lunch today.


Salad:
About 6 or 7 grape tomatoes.
1/2 an english cucumber
1/2 an orange pepper
1/3 C broccoli
about 1/3 C peas (frozen, thawed)
a handful of sunflower seeds
about 5 leaves of fresh basil, chopped

Dressing:
1/2 avocado
1 clove garlic (grated)
2 tbsp lemon juice
3 tbsp water
chopped fresh basil (about 2 leaves)
Salt (to taste)

Instructions:
1 - Put all of the dressing ingredients into a food processor or blender (or use a stick blender like me), and puree them.  Set aside.
2 - Chop the veggies (except the peas)
3 - Mix in peas, sunflower seeds and basil
4 - Pour the dressing over the salad.
5 - EAT!

Tuesday 10 July 2012

Homemade Almond Butter - EASY!

Who knew that making homemade nut butters could be SO EASY?!?!

All you need is a food processor and whatever kind of nut or seed you want (I do not, however, recommend using a person who IS nuts...*).

That's IT.  Oh, and something to keep it in.  And an appetite.

So, here's what you do.

Measure out the nuts you want to use.  I used 1 Cup - it made 1/2 of a small mason jar of butter.  I made almond butter with raw, unsalted almonds.  You could use salted, roasted, seasoned, etc.  You could mix a bunch of nuts together.  Whatever.


Then, put the nuts into the food processor and turn it on.

As the oil is released from the nuts, it may start to stick to the sides.  I had to stop the food processor every minute or so to scrape the sides.

Ooooohhhh, look at that food processor go!

Eventually, the nuts will start sticking together and form a ball, like this:

Then, ALL OF A SUDDEN, the ball will release itself into a creamy, delicious BUTTER.

When it is to the consistency you like, put it into a jar!

Then eat the delicious goodness :)  Enjoy!

If you keep it in the cupboard, it will separate, but you can still use it - you just have to stir it together.  If you don't want it to separate, then keep it in the fridge. MMMmmmMMMmmmMMMmmm.

Note:  I am not brilliant.  I got this idea from pinterest, from this site: http://www.loveveggiesandyoga.com/2012/07/homemade-peanut-butter.html

*Matt did not marry me for my sense of humor!